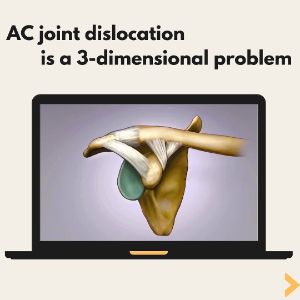
Breakthrough Procedure
GROUND BREAKING AC Joint Separation surgery technique by Dr. Steven Struhl
Original Technique
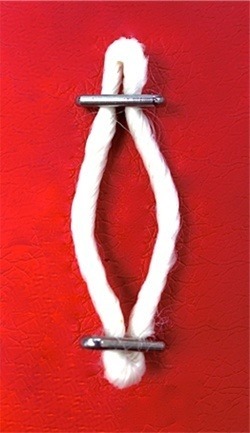
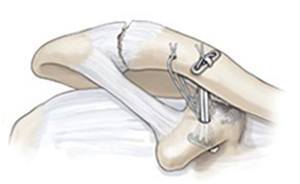
The AC joint is reduced to its anatomical location and held in place with two small plates (endobuttons) connected by a continuous loop of extremely strong suture. The course of the device is anatomically placed and there are no knots, eliminating the possibility of knot slippage.
Technique detail
Because of the powerful deforming forces disrupting the AC joint, the repair technique must be extremely strong in the direction of the deforming forces yet flexible in other planes to allow for normal shoulder movement. This is accomplished by connecting two small metal plates (endobuttons) with a continuous loop of suture. This unique construct eliminates any “weak links” in the system providing reliable stability during the time it takes for the body to provide true biological healing.
Exposure
A small incision (1-2 inches) is made over the front of the shoulder, exposing the top of the clavicle and the top of the coracoid. It is not necessary to cut any muscle off the bone. The deltoid muscle is simply split in line with its fibers in order to visualize the repair site. With upward force on the arm the joint is reduced so that the acromion lines up with the clavicle.
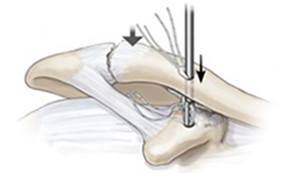
Bone preparation
A drill hole is made in the clavicle and then into the coracoid process. This drill hole is in the same location as the native (but torn) coracoclavicular ligament.
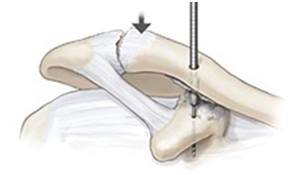
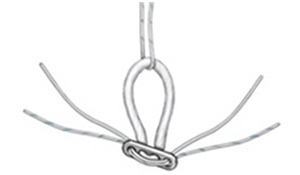
Endobutton implant
The distance from the top of the clavicle to the bottom of the coracoid is measured and a closed loop endoubtton of matching length is chosen. Three sutures are added to the button. One is to facilitate passage, the second one will secure the button in place, and the third will be passed through a separate drill hole to replicate the course of the trapezoid component of the normal coracoclavicular ligament and control movement in the horizontal plane.
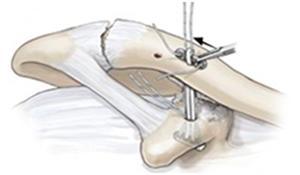
Endobutton passage
The endobutton and its associated sutures are then pushed through both drill holes and out the bottom of the coracoid process. Then the endobutton is “deployed” so that it seats flush against the underside of the bone. The loop of correct length is then pulled up through the clavicular hole and a second endobutton slid under the small bit of loop protruding out the top of the clavicle. Depending on the measured length the button will either be a standard endobutton or if extra space is needed a thicker button (Xtendobutton) will be used.
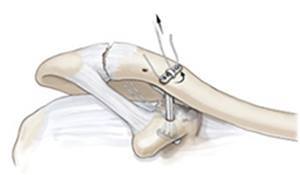
Fixation
Two suture tails that are anchored in the first (coracoid) endobutton are now passed through opposite holes of the second (clavicular) endobutton. The endobutton is now seated flat on top of the clavicle and the sutures tied on top, thereby holding this endobutton into place. A second suture is passed into a separate drill hole in between the main drill hole and the AC joint and tied giving additional fixation and stability.
Final Repair
At this point the torn acromioclavicular and coracoclavicular ligaments are sutured and tied, providing additional fixation and recreating the original anatomy. If the injury is chronic then the CA ligament is detached from the acromion and connected to the clavicle in order to reestablish a biologic connection between the clavicle and coracoid.
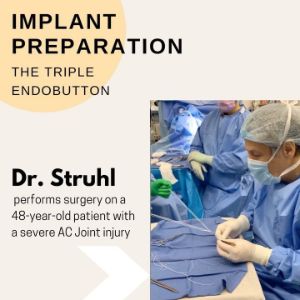
Dr. Struhl’s article
Click here to open and read Dr. Struhl’s published article on Double Endobutton Technique for Repair of Complete Acromioclavicular Joint Dislocations
Since the publication of the technique article the first endobutton (the coracoid button) is now deployed by “pulling” it into place using a retrograde technique rather than “pushing” it into place as originally described. This simplifies the button deployment step of the surgery and has been found to be much easier. This video demonstrates how this is done.
Current technique using a complete two button technique
The procedure is simplified even further by modifying the implant so that both buttons are on the same continuous loop and it is no longer necessary to slide the second button into the loop after it is passed throught the clavicle. The basic steps are the same but now with two buttons on the same loop the passage and deployment is much simpler. The device is passed in the reverse direction from the original technique, being passed from the underside of the coracoid up through the coracoid bone and then the clavicle. Once it exits the clavicle it is simply “flipped” and deployment is complete. The rest of the steps are the same. If extra length is needed then either one or two washers are placed on top of the clavicle and the button sits atop the washer(s).
Contact our practice today to schedule a consultation with Dr. Struhl.